How to create a minimal static website with Pelican?
20 Jul 2020 by Vladimir Haltakov
In this tutorial, I will show you how to create a minimal static website and blog using Pelican and deploy it on Netlify. To goal is to start simple with a minimal set of features and add more functionality later as needed. I will also explain why I decided to use a static site generator and why I chose Pelican. If you are not interested in the first part, you can directly jump to the How To section of the tutorial.
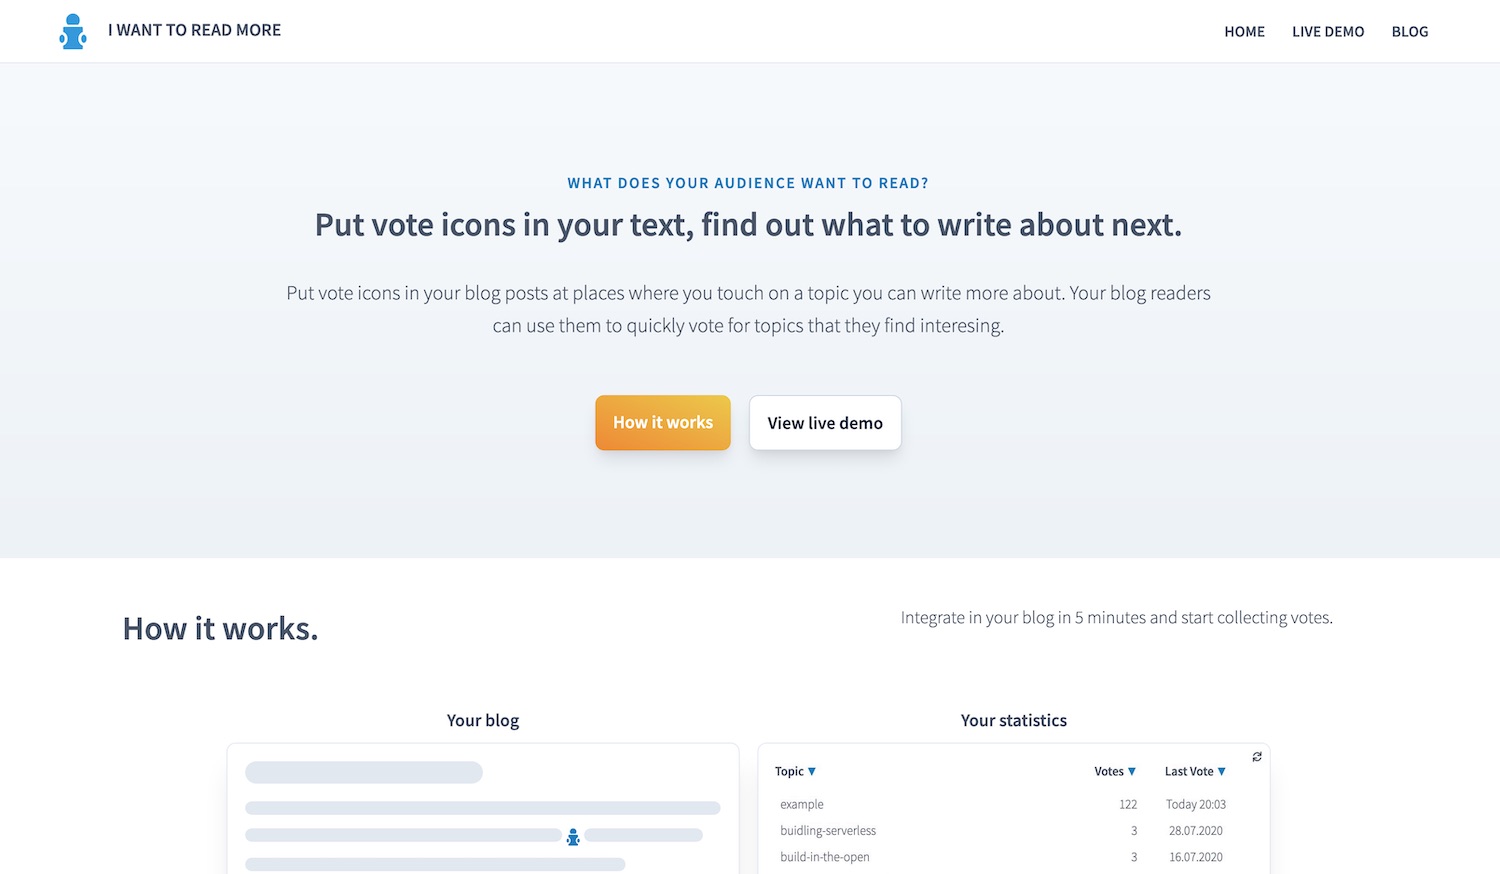
The I Want To Read More website generated with Pelican
Why static site generator?
When I started building I Want To Read More I wanted to launch a prototype quickly , so I could validate the idea. This meant avoiding as much complexity as possible. Using a static site generator and going serverless seemed like the best way to achieve this.
A static site generator uses template files to define the structure and design of the site. The content, like for example the blog posts, is stored separately, usually in Markdown format. When the generator builds the site, the final HTML files are generated by combining the templates and the content files. This allows you to avoid code duplication and to be able to focus on the content when writing. Many static site generators are explicitly focused on blogs.
The big advantage of statically generated sites is that their hosting is simple and cheap. The web server simply needs to serve the generated HTML pages. Compared to dynamic content management systems (CMS), like Wordpress, Ghost or Wix, static sites are safer, faster and consume less resources. That's why you can find many static site hosting providers that offer generous free plans like Netlify, GitHub Pages or AWS S3. Dynamic sites are usually either paid (Ghost) or offer a more limited free tier. For example, using the free plan, you cannot have a custom domain on Wordpress.com and have very limited bandwidth on Wix.
Some more advanced features may be easier to implement in a CMS, like for example sophisticated publishing systems. Our goal here, though, is to get something up and running quickly and cheaply.
You will also need some technical knowledge to set everything up, but the effort is worth it. It this tutorial I will show you how you can remove a lot of the complexity in the process. I will also provide you with templates so you can create a simple site with a blog with minimal effort.
Why I chose Pelican?
There are literally hundreds of static site generators, so how do you choose one? My approach here was to go for one that is implemented in a language I'm already familiar with. While you will not need to write code to configure the generator, you will probably have some experiences with the tools of the particular language. I decided to go with a Python based static site generator, but here are some ideas for other languages as well:
- Python - Pelican, Nikola, Hyde
- Ruby - Jekyll, Bridgetown, Middleman
- JavaScript - Gatsby, Eleventy, Nuxt
Another thing to consider is if the site generator has a particular focus. Some are more suitable for blogs, while other specialize in project documentation. Choose one that is suitable for your use case. For I Want To Read More it was important for me to be able to easily create static pages and a blog.
When choosing a framework, I like to choose a mature and popular project. Such projects have the advantage that there will be a big community and you will easily find solutions to common problems. If you need some specific feature, though, it may be worth checking some of the more specialized options.
I recommend checking StaticGen, which is a list of static site generators. You can filter the different projects by their programming language and compare them by popularity and specialization.
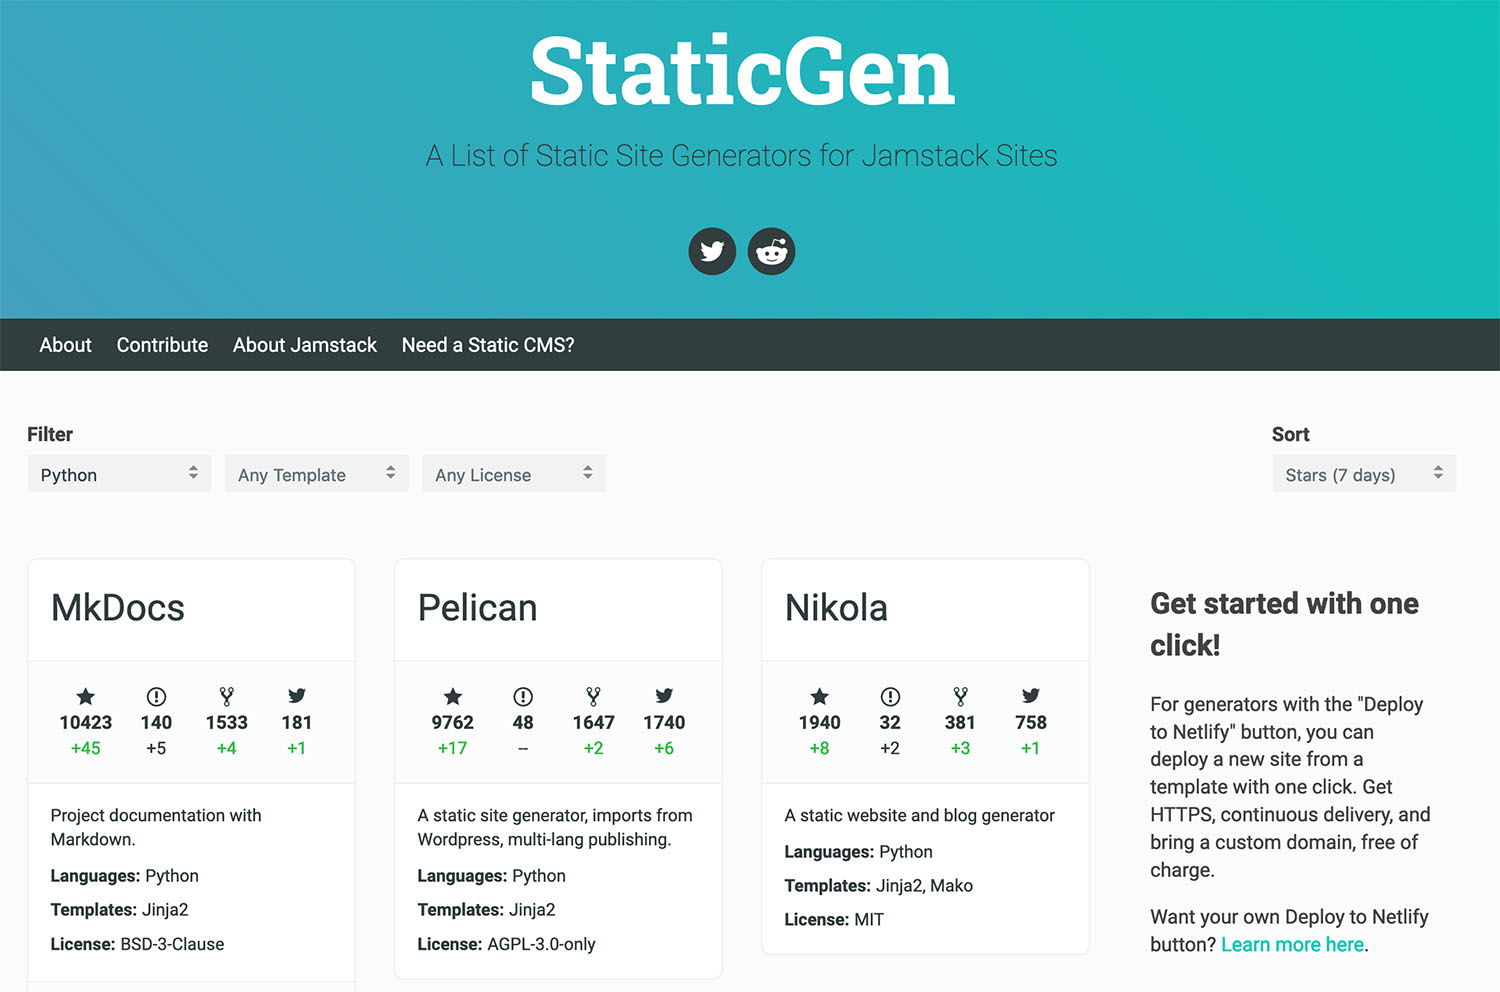
Choosing a static site generator on StaticGen
After I compared the different Python options, I decided to go with Pelican. Another popular Python generator is MkDocs, but it seems to be specialized for project documentation, instead on blogs. Nikola and Hyde had much less start on GitHub, which I find to be a good proxy for popularity.
In the next section, I will go through the steps that you need to do in order to create a minimal static site with a blog using Pelican. I will also show you how to deploy the site on Netlify using the free plan.
How to create a static site and a blog with Pelican?
I found Pelican's default configuration and theme a bit overwhelming for a simple website. There are just too many features and options that you don't need in the beginning. So, I created a configuration that is stripped down to only the most important things. I personally like an iterative approach, where I quickly create something working end-to-end and build on top of it.
I went through the code of the default notmyidea theme and stripped it down as much as possible. You can find the code of my minimal theme in the I Want To Read More GitHub repository here. This is the branch where the basic website is created and you can use it as a template for creating your own. Note, that this branch was merged into master and deployed in production. This is really the code used for the I Want To Read Mode website.
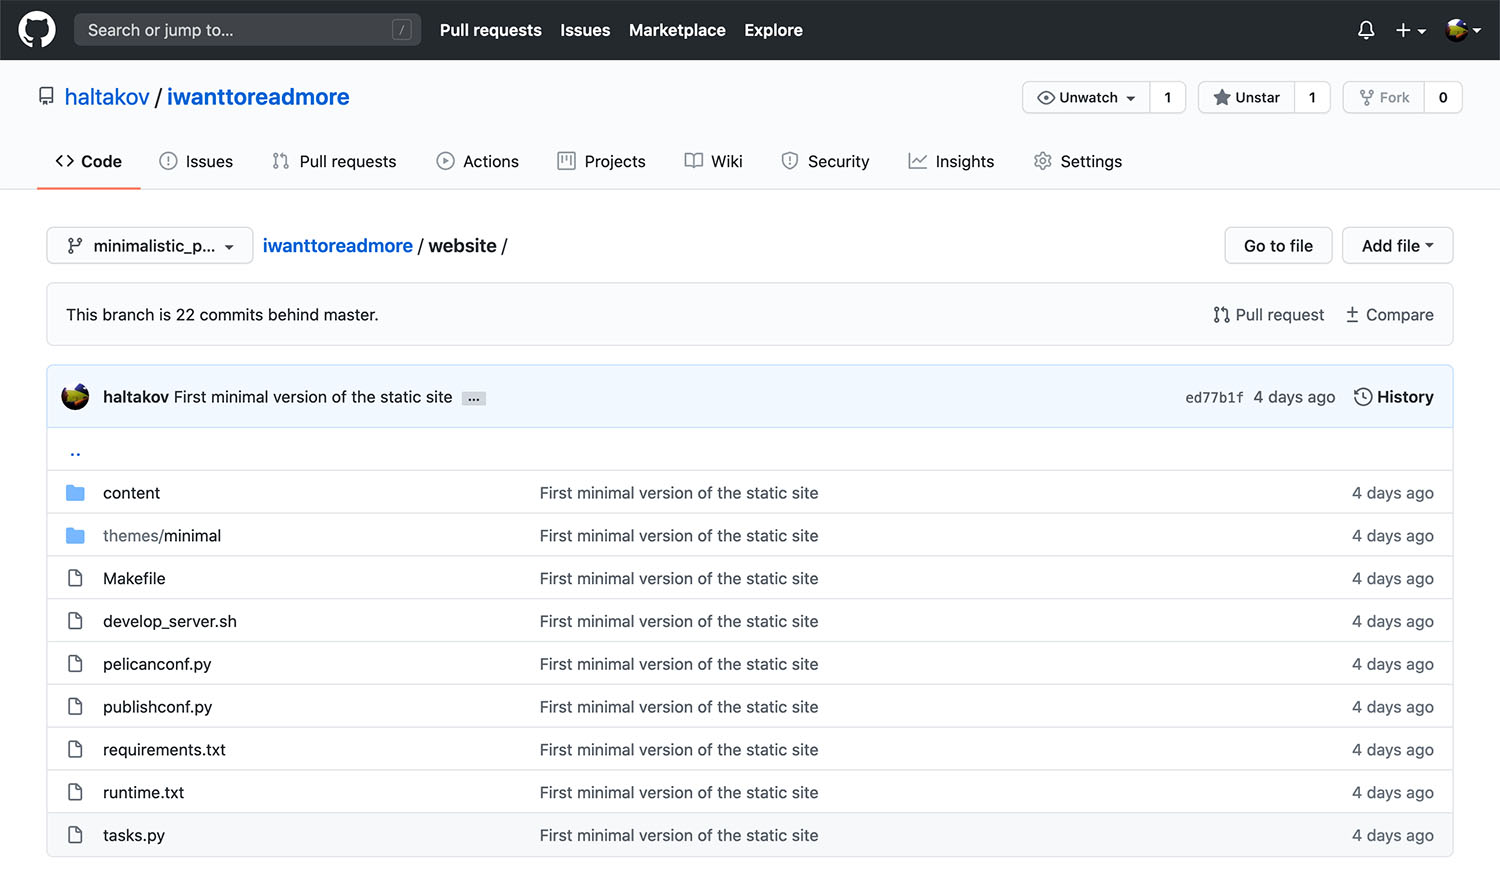
The minimal website code on GitHub
1. Install Pelican
You can easily install Pelican with pip. You should also choose what markup language you want to use for your content. Pelican supports both Markdown and reStructuredText, but I went with Markdown since I'm already familiar with it.
pip install pelican markdown
2. Create a Pelican project.
After Pelican is installed, you can create a new project with the pelican-quickstart tool:
pelican-quickstart
It will ask you several questions like website title, author and URL. You should answer yes to the generation of automation scripts, because they will be useful, when deploying on Netlify. The tool will also offer you configuration for different ways of uploading your website. I rejected all of them because the deployment on Netlify can be easily done when pushing to the git repository. Here is my log of setting up I Want To Read More.
Welcome to pelican-quickstart v4.2.0.

This script will help you create a new Pelican-based website.

Please answer the following questions so this script can generate the files
needed by Pelican.

> Where do you want to create your new web site? [.] .
> What will be the title of this web site? I Want To Read More
> Who will be the author of this web site? Vladimir Haltakov
> What will be the default language of this web site? [en] en
> Do you want to specify a URL prefix? e.g., https://example.com   (Y/n) Y
> What is your URL prefix? (see above example; no trailing slash) https://iwanttoreadmore.com
> Do you want to enable article pagination? (Y/n) n
> What is your time zone? [Europe/Paris]
> Do you want to generate a tasks.py/Makefile to automate generation and publishing? (Y/n) Y
> Do you want to upload your website using FTP? (y/N) n
> Do you want to upload your website using SSH? (y/N) n
> Do you want to upload your website using Dropbox? (y/N) n
> Do you want to upload your website using S3? (y/N) n
> Do you want to upload your website using Rackspace Cloud Files? (y/N) n
> Do you want to upload your website using GitHub Pages? (y/N) n
The newly created Pelican site will contain several folders and files that form the skeleton of your site. The following are the most important:
content- this is where you put your blog articles. You can also add the images that you will include in your posts here.themes- here you have the Jinja template files that will be used to generate the HTML code as well as your static assets (images, CSS, JavaScript). There are many predefined Pelican themes, but you will probably want to create a specific one for your website. It is a good idea to start from an existing theme and modify it.pelicanconf.py- the main configuration file of your site. Here, you can set variables to configure the different Pelican features.publishconf.py- configuration that applies when building the site for publishing.output- the folder where all the generated files will be stored.
3. Adapting the theme.
At this stage, you can take my minimal theme as a basis and change it to fit your website. It is stripped down to the most important features and it will allow you to start quickly. You can get the code on GitHub here. Below, I will describe how I created it.
4. Disabling unneeded features.
I first disabled the generation of several blog pages that I don't need, like for example the archives, tags, categories or authors pages. This can be done in the pelicanconf.py file.
# Disable unneeded blog features
ARCHIVES_SAVE_AS = ""
AUTHOR_SAVE_AS = ""
AUTHORS_SAVE_AS = ""
CATEGORY_SAVE_AS = ""
CATEGORIES_SAVE_AS = ""
TAGS_SAVE_AS = ""
Removing these pages means that you don't have to take care of designing the templates for them in your theme. You can of course enable them again later if needed.
5. Adapting the templates.
After removing most blog pages, there are only 3 templates that I needed to adapt to my website:
base.html- this template defines the structure of every page. It contains the common header, navigation bar and footer.index.html- this is your blog's index page, that contains a list of all your articles. While it is possible to have some featured articles on top, I removed them for now in order to keep things simple.article.html- this is the template used to render a blog post. It is a small wrapper around the actual text of the article coming from the Markdown files in thecontentfolder.
6. Creating static pages outside the blog.
The default Pelican setup assumes that your website's index will be your blog's index page. However, for I Want To Read More I wanted to have a landing page that describes the product. The blog is available at https://iwanttoreadmore.com/blog.
To achieve this, you first need to create the template for your landing page (and other static pages if needed). I put all static pages that should be generated outside the blog in a folder pages under the templates folder. The file for the site's index is called index.html. We can still make use of the structure that is defined in base.html, so I only specified the content of the landing page.
After that, you need to tell Pelican the URLs at which your static pages will be available in the configuration. As you can see in the pelicanconf.py file, I have the index page and the 404 error page.
# Static pages of the website that will be generated
TEMPLATE_PAGES = {
    "pages/index.html": "index.html",
    "pages/404.html": "404.html",
}
Finally, you need to point the blog to the new URL:
# Settings for the URLs of the blog and the articles
ARTICLE_PATHS = ["blog"]
ARTICLE_URL = "blog/{slug}/"
ARTICLE_SAVE_AS = "blog/{slug}/index.html"
INDEX_SAVE_AS = "blog.html"
7. Writing an article.
Before you can generate your site, you need to write at least one article. You can just create a new Markdown (.md) file that starts with Pelican metadata (see the official documentation for details). The most important elements to get started are Title, Date and Summary. Check out the example article I created for testing. If you want to see a real article, you can check out how I created the article you are now reading on GitHub (isn't this meta? 🤗).
8. Metadata and social media tags.
It is important that every page of your site has good metadata. This will allow it to rank higher in search engine results and display a nice preview on social media. In the base.html file I defined some generic metadata that will be used by default.
<!-- General medatada -->
<meta name="author" content="{{ AUTHOR }}" />
<meta name="title" content="{% block title %}{{ SITENAME }}{% endblock %}" />
<meta name="description" content="{% block description %}{{ SITEDESCRIPTION }}{% endblock %}" />
<meta name="viewport" content="width=device-width, initial-scale=1, shrink-to-fit=no" />

<!-- Social media tags -->
<meta property="og:title" content="{{ self.title() }}" />
<meta property="og:description" content="{{ self.description() }}" />
<meta property="og:image" content="{% block image %}{{ SITEURL }}/images/cover-image.jpg{% endblock %}" />
<meta property="og:url" content="{% block url %}{{ SITEURL }}{% endblock %}" />
<meta property="og:site_name" content="{{ SITENAME }}" />
<meta name="twitter:site" content="@haltakov" />
<meta name="twitter:card" content="summary_large_image" />
<meta name="twitter:image:alt" content="{{ self.description() }}" />
This information can then be changed by the individual pages. I used Jinja template blocks so I can override the description from the other pages to make them more specific. In the case of the blog articles, these values are then filled from the Markdown metadata (see article.html).
{% block title %}{{ article.title }}{% endblock %}
{% block url %}{{ SITEURL }}/{{ article.url }}{% endblock %}

{% if article.summary %}
{% block description %}{{ article.summary | striptags | safe | truncate(300) }}{% endblock %}
{% endif %}

{% if article.image %}
{% block image %}{{ SITEURL }}/images/{{ article.image }}{% endblock %}
{% endif %}
For a nice summary of the different social media tags check out this article.
9. Generating your site.
You can build your site and see how it looks like by running the following command:
pelican content --listen
This will generate the final HTML files and start a local server that you can access at http://localhost:8000. You can also take a look in the output folder to see the generated HTML files. You site is now ready for deployment!
How to deploy your site on Netlify?
Netlify is a hosting provider for static websites that has a generous free tier. You get up to 100 GB monthly bandwidth and you can add custom domains for free. This should be more than enough to run your website in the beginning. They also offer many useful (sometimes paid) features, like server-side analytics, identity management, forms, functions and A/B testing. I chose Netlify, because it is developer friendly and easy to use, but they also offer advanced features if you need them.
Configuration for Netlify.
Before deploying to Netlify you need to specify your project's Python dependencies and the Python runtime. Netlify will install the packages specified in your requirements.txt file when building your site on their servers. You need to specify Pelican and Markdown as dependencies:
Markdown>=2.6.11
pelican>=4.2.0
Specifying the Python runtime is not obligatory, however, Netlify uses Python 2.7 instead of Python 3 by default. This may cause problems with some plugins. You can set the Python runtime version by putting the required version number (for example 3.7) in the runtime.txt file.
Deploying on Netlify.
Netlify offers different options to deploy your website , but I prefer the automatic deploys from a GitHub repository. There are few simple steps you need to do to connect your repository that are documented here. The only thing that is specific to deploying a Pelican website is the "Build command" and the "Publish directory" settings (step 5 from Netlify's manual):
- Build command - the command that Netlify should use to build your website. You can use
make publishfor that. - Publish directory - here you need to specify the relative path to the output directory where the generated files are stored. For I Want To Read More this is
website/output.
In the end, your deploy configuration should look something link this:
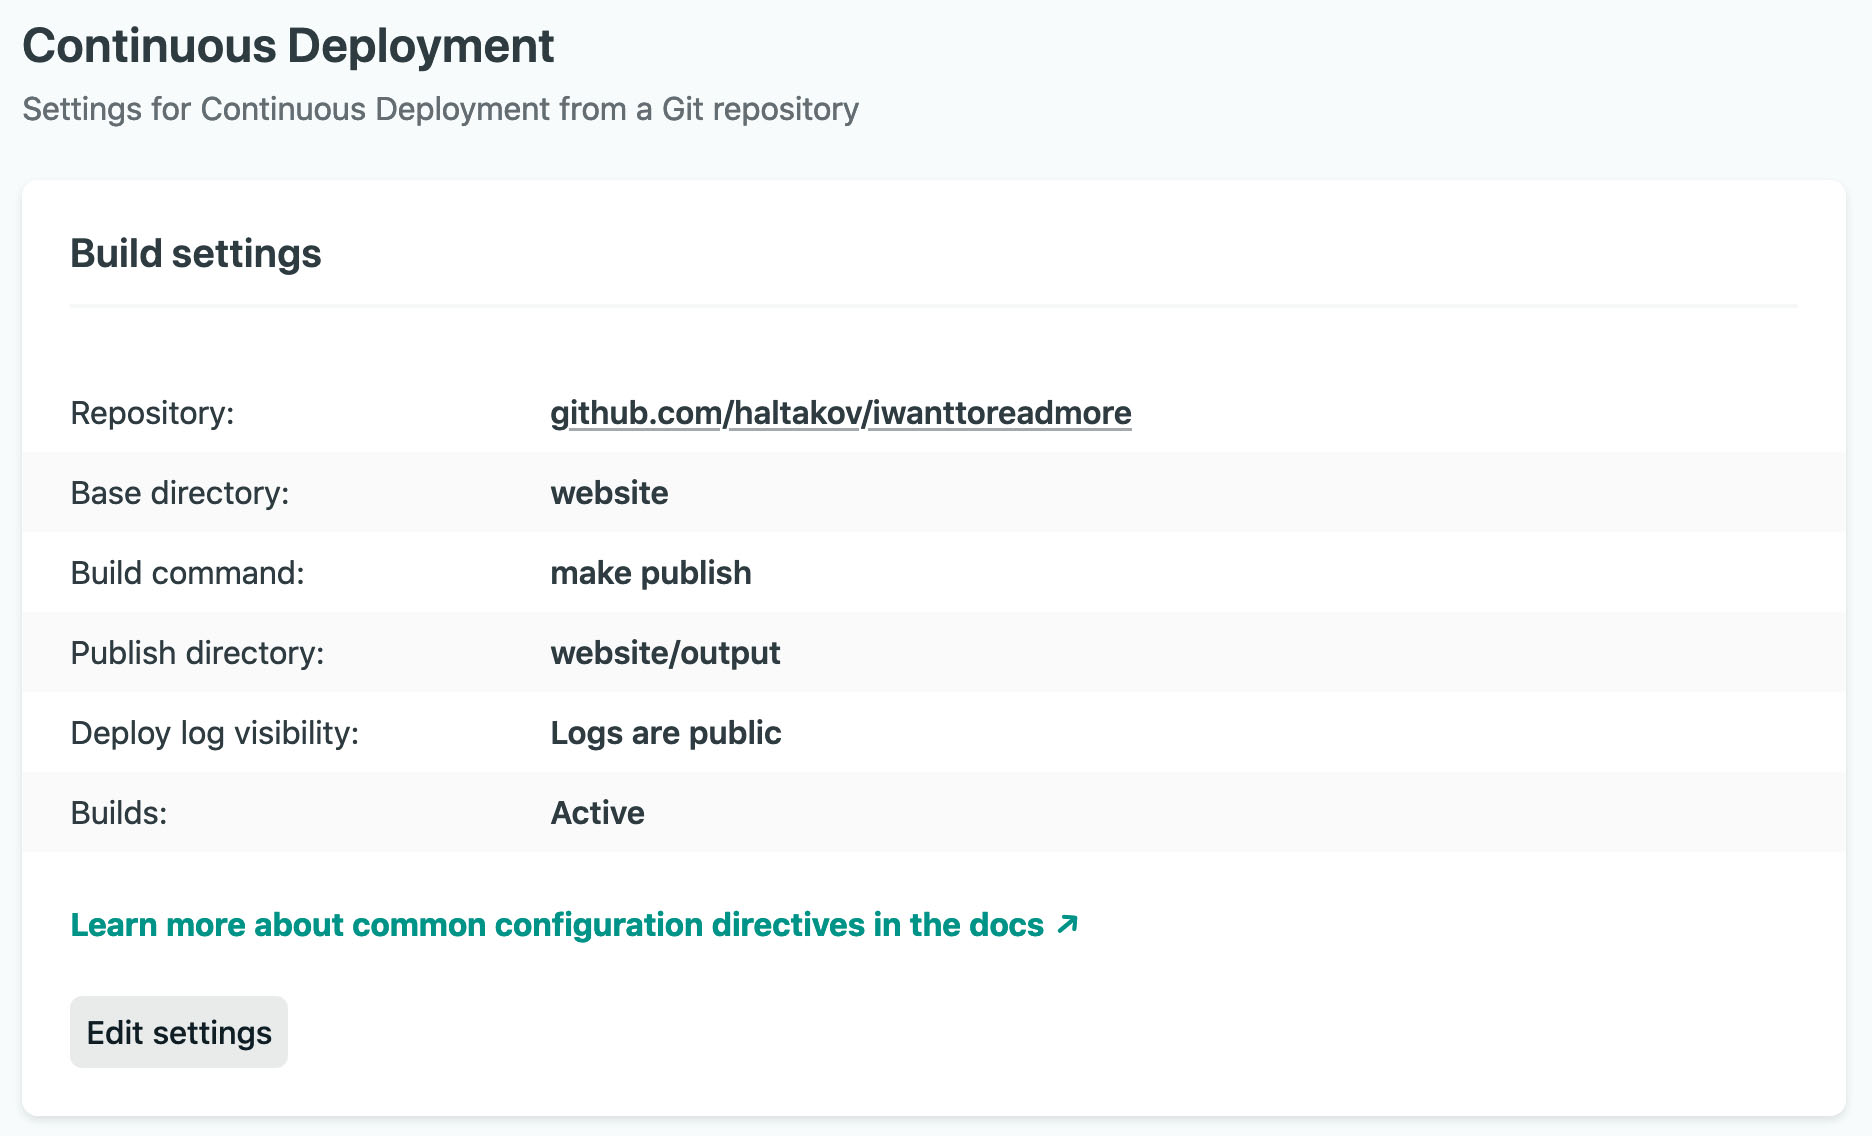
Netlify deploy configuration for I Want To Read More.
Now you can just push an update of your code to the master branch and Netlify will build and deploy the website automatically. This is also done for branches so you can preview of your changes and make sure that everything is building correctly. Netlify offers many further possibilities to manage and optimize your build and deployment process, which I will cover in a future post .
What's next?
The next step in this tutorial series is building a backend API and database so store the votes . In the future posts, I will also write about creating pages that fetch data from the backend , creating a subscription form with Mailchimp and further optimizing the website . Click on the voting icons if you are particularly interested in some of the topics and subscribe below to get my next tutorials per e-mail.
Don't miss the next update
Subscribe to our newsletter below if you don't want to miss our next update. We are constantly working on some new tutorials about building a SaaS product.